Expo Router vs React Navigation — Which One Should You Use in 2026?
You don't just write navigation code. You make decisions that every screen, every deep link, and every new team member will live with.
Ask ten React Native developers which navigation library to use, and you'll get ten passionate opinions. Some swear by React Navigation. Others won't start a new project without Expo Router. A few will confidently tell you they're "basically the same thing" — and they're half right.
This article isn't a fanboy piece for either side. It's a practical breakdown — from beginner to production scale — of when each approach wins, where each approach hurts, and how to make the right call for your specific situation in 2026.
Let's start at the beginning.
1. What Routing Means in Mobile Applications
Routing Is Not Just "Going to Another Screen"
In web development, routing is straightforward: the URL changes, the browser renders a different page. The browser handles history, the back button, deep links — all of it.
In mobile, you own all of that.
There's no address bar. No browser history stack. No automatic deep link handling. When a user taps a notification and expects to land on a specific chat room inside your app, you write the code that makes that happen. When they press the Android back button, you decide what happens. When they switch apps and come back, you manage the state they return to.
Routing in React Native means:
- Managing a stack of screens (which screens are "open" in memory)
- Handling transitions between screens (how screens appear and disappear)
- Parsing deep links (a URL that opens a specific screen)
- Protecting routes (making sure unauthenticated users can't reach the dashboard)
- Preserving state (the feed scroll position survives a tab switch)
This is what navigation libraries exist to solve. And the two most important ones in the React Native ecosystem — React Navigation and Expo Router — solve it very differently.
2. Why Navigation Is Important in React Native Apps
Navigation Is Architecture
Most developers think of navigation as a feature — something you "add" to an app. In reality, navigation is the skeleton of your app. Every screen, every user flow, every deep link depends on it. The choices you make early in navigation setup ripple through your entire codebase.
Get it wrong and you'll face:
- Deep link nightmares — adding deep links to an existing app built without them in mind can take days.
- Auth guard spaghetti — protecting routes across a manually configured navigator becomes a maze of conditionals.
- Navigation prop drilling — passing
navigationas a prop through 4 layers of components to make one button work. - Onboarding new developers slowly — a new team member needs to read a 300-line navigation config file before they understand how the app flows.
Get it right and navigation becomes invisible. Screens just work. Deep links just open. Auth protection just applies. New developers can read the folder structure and understand the app.
3. Brief History of React Navigation
The Standard Bearer Since 2017
React Navigation was created in 2017 to solve a real problem: React Native's built-in navigation (NavigatorIOS, Navigator) was platform-specific, buggy, and being deprecated. The community needed a JavaScript-first, cross-platform navigation library.
React Navigation quickly became the de facto standard. It offered:
- Stack navigators (push/pop screens)
- Tab navigators (bottom tab bar)
- Drawer navigators (side menu)
- Deep link configuration
- A flexible, composable API
By 2020, React Navigation v5 introduced a component-based API that made composing navigators much cleaner. v6 (2021) refined the API further. Today, React Navigation v7 is mature, battle-tested, and powers thousands of production apps — including apps at companies you use daily.
It is still the most widely used navigation library in React Native. That matters.
The Mental Model: Declarative Navigator Trees
React Navigation's model is: you declare navigators as components, nest them, and configure screens as children.
// The React Navigation way
function AppNavigator() {
  return (
    <NavigationContainer>
      <Stack.Navigator>
        <Stack.Screen name="Home" component={HomeScreen} />
        <Stack.Screen name="Profile" component={ProfileScreen} />
        <Stack.Screen name="Settings" component={SettingsScreen} />
      </Stack.Navigator>
    </NavigationContainer>
  );
}
Clear, explicit, and powerful. You see exactly which screens exist and how they're connected — all in one place.
4. Problems Developers Faced With Traditional Navigation Setup
The Boilerplate Accumulation Problem
React Navigation is powerful, but power comes with ceremony. As your app grows, your navigation file grows with it — and it grows fast.
Here's what a moderately complex app's navigation setup looks like:
// This is a SIMPLIFIED version. Real apps are 3x longer.
function AppNavigator() {
  const { isAuthenticated } = useAuth();

  return (
    <NavigationContainer linking={linking}>
      <RootStack.Navigator screenOptions={{ headerShown: false }}>
        {isAuthenticated ? (
          <>
            <RootStack.Screen name="Main" component={MainTabs} />
            <RootStack.Screen name="CreatePost" component={CreatePostModal} />
            <RootStack.Screen name="StoryViewer" component={StoryViewerModal} />
            <RootStack.Screen name="ImageViewer" component={ImageViewerModal} />
          </>
        ) : (
          <>
            <RootStack.Screen name="Login" component={LoginScreen} />
            <RootStack.Screen name="Register" component={RegisterScreen} />
            <RootStack.Screen name="ForgotPassword" component={ForgotPasswordScreen} />
          </>
        )}
      </RootStack.Navigator>
    </NavigationContainer>
  );
}

function MainTabs() {
  return (
    <Tab.Navigator>
      <Tab.Screen name="Feed" component={FeedStack} />
      <Tab.Screen name="Explore" component={ExploreStack} />
      <Tab.Screen name="Notifications" component={NotificationsStack} />
      <Tab.Screen name="Profile" component={ProfileStack} />
    </Tab.Navigator>
  );
}

function FeedStack() {
  return (
    <Stack.Navigator>
      <Stack.Screen name="FeedHome" component={FeedScreen} />
      <Stack.Screen name="PostDetail" component={PostDetailScreen} />
      <Stack.Screen name="Comments" component={CommentsScreen} />
      <Stack.Screen name="UserProfile" component={UserProfileScreen} />
    </Stack.Navigator>
  );
}
// ... ExploreStack, NotificationsStack, ProfileStack all follow the same pattern
This is maintenance overhead that grows with every new screen. Add a new screen? Update the navigator. Add a deep link? Update the linking config separately. Rename a screen? Update the navigator, the linking config, and every navigation.navigate('ScreenName') call across the codebase.
The Five Core Pain Points
1. Screens and routes are decoupled by default. You define a screen in the navigator, then write a separate component file for it, then configure its deep link path in a third place. Three places to update for one new screen.
2. The navigation prop is everywhere.
To navigate from a child component, you either pass navigation down as a prop, use useNavigation() hook, or write workarounds. It's not terrible, but it adds friction.
3. Deep link configuration is manual and error-prone.
const linking = {
  prefixes: ['myapp://'],
  config: {
    screens: {
      Main: {
        screens: {
          Feed: {
            screens: {
              PostDetail: 'posts/:postId',       // manually written
              Comments: 'posts/:postId/comments', // easy to get wrong
            }
          }
        }
      }
    }
  }
};
For a large app, this config can be hundreds of lines. And it's maintained separately from the actual screens. When routes change, deep links break silently.
4. TypeScript is powerful but verbose. React Navigation has excellent TypeScript support, but typing your navigator params is a substantial amount of boilerplate that you write and maintain manually.
5. Sharing layout between screens is manual. Want a common header, a banner, or a context provider shared by a group of screens? You wrap the stack in a component, or use screen options. It works, but it's not declarative — you can't look at the file structure and know what's shared.
5. Why Expo Router Was Introduced
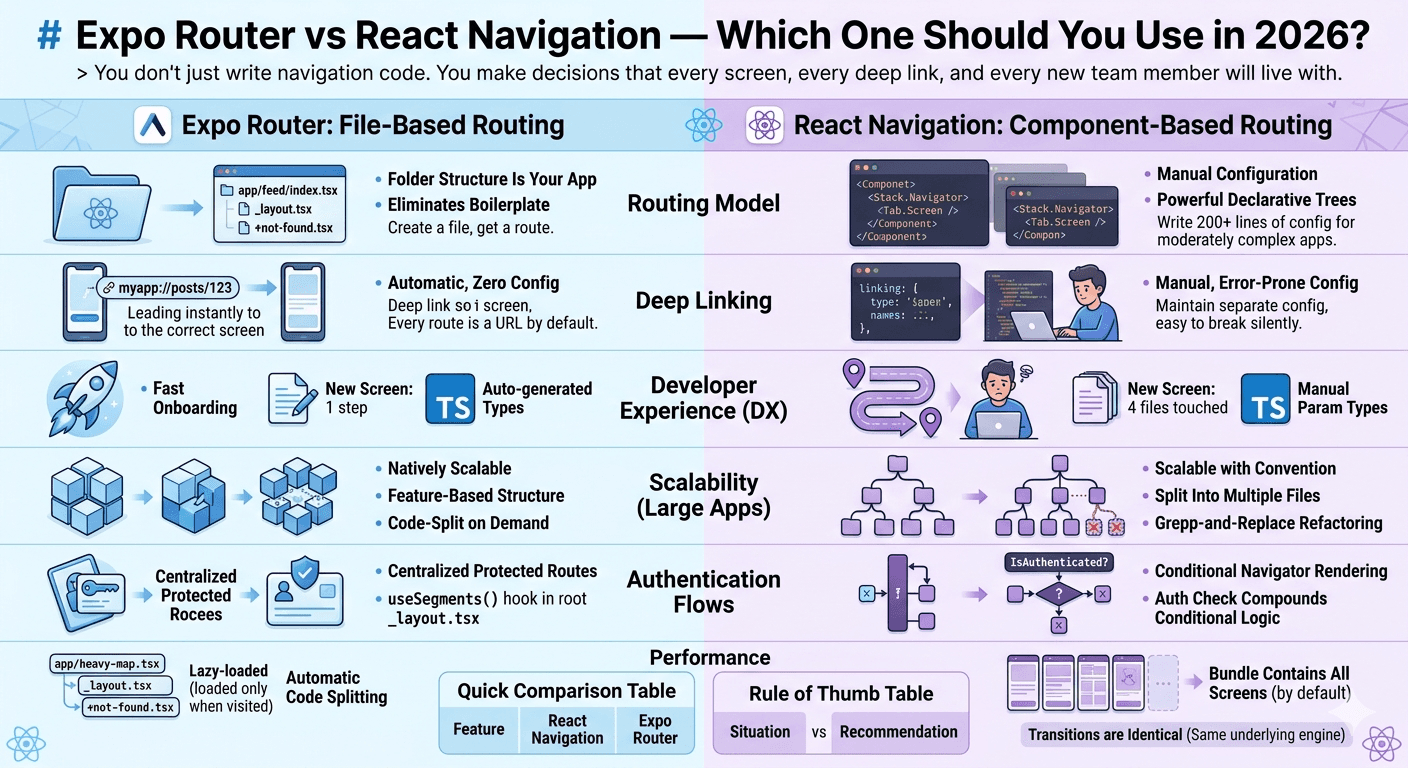
The Insight: Your Folder Structure Is Your App
In 2022, Evan Bacon (at Expo) introduced Expo Router with a simple idea: what if your file system defined your routes?
Next.js had already proven this model for web. Every file in pages/ or app/ is a route. No configuration. No separate routing file. You create a file, and the route exists.
Expo Router brought this exact mental model to React Native.
The goals were explicit:
- Eliminate routing boilerplate. Create a file, get a route.
- Make deep links automatic. Every route is a URL by default.
- Enable shared layouts without ceremony.
_layout.tsxwraps everything in its folder. - Improve discoverability. Read the folder, understand the app.
- Unify web and native routing. The same Expo Router app can render on web and native with the same route structure.
The Key Insight: Expo Router IS React Navigation
Here's what most articles don't say clearly enough: Expo Router is built on top of React Navigation. It uses the same underlying library. You get the same navigation performance, the same transitions, the same native feel.
What Expo Router adds is a convention layer — a set of rules about how files map to routes, so you don't have to configure them manually.
Traditional Navigation Setup vs File-Based Routing
━━━━━━━━━━━━━━━━━━━━━━━━━━━━━━━━━━━━━━━━━━━━━━━━

React Navigation:
  navigator.tsx        ← You write this: 200+ lines
      │
      ├── Define Stack
      ├── Define Tabs
      ├── Define Screens (manually)
      ├── Define deep link config (manually)
      └── Define auth guard (manually)

Expo Router:
  app/
  ├── (auth)/login.tsx     ← File exists = route exists
  ├── (tabs)/index.tsx     ← Parentheses = layout group
  └── [postId].tsx         ← Brackets = dynamic route

  _layout.tsx files handle auth, shared providers — once.
  Deep links are automatic. TypeScript types are generated.
6. File-Based Routing Explained Simply
The Core Concept: Files Are Screens
In Expo Router, the app/ directory is special. Every .tsx file inside it becomes a screen. The file path becomes the route path.
app/index.tsx          →  /              (home screen)
app/profile.tsx        →  /profile
app/settings.tsx       →  /settings
app/posts/[id].tsx     →  /posts/123     (dynamic)
app/posts/[id]/comments.tsx  →  /posts/123/comments
That's it. No navigator config. No screen registration. No linking config. Create the file, the route exists.
Expo Router Folder → Screen Mapping
app/
├── _layout.tsx              ← Root layout (wraps everything)
├── index.tsx                → Route: /
│
├── (auth)/                  ← Route GROUP (no URL segment)
│   ├── _layout.tsx          ← Auth layout (no tab bar, simple stack)
│   ├── login.tsx            → Route: /login
│   ├── register.tsx         → Route: /register
│   └── forgot-password.tsx  → Route: /forgot-password
│
├── (tabs)/                  ← Route GROUP (tab bar layout)
│   ├── _layout.tsx          ← Defines the tab navigator
│   ├── index.tsx            → Route: /          (Home tab)
│   ├── explore.tsx          → Route: /explore
│   ├── notifications.tsx    → Route: /notifications
│   └── profile.tsx          → Route: /profile
│
├── posts/
│   ├── [postId].tsx         → Route: /posts/abc123    (dynamic)
│   └── [postId]/
│       └── comments.tsx     → Route: /posts/abc123/comments
│
└── +not-found.tsx           → 404 screen
Special File Conventions
| Filename | Purpose |
|---|---|
_layout.tsx |
Wraps all sibling files in the same folder |
index.tsx |
The default screen for that folder's path |
[param].tsx |
Dynamic route — param is available as useLocalSearchParams() |
[...rest].tsx |
Catch-all route — matches any remaining segments |
+not-found.tsx |
Custom 404 screen |
(groupName)/ |
Route group — groups screens without adding a URL segment |
Dynamic Routes in Practice
// app/posts/[postId].tsx
import { useLocalSearchParams } from 'expo-router';

export default function PostDetail() {
  const { postId } = useLocalSearchParams<{ postId: string }>();
  // postId is automatically typed and populated from the URL

  return <PostView id={postId} />;
}
No route.params. No prop drilling. No navigator config. The URL segment becomes a typed variable.
7. Nested Layouts and Shared Layouts in Expo Router
The _layout.tsx File: Your Secret Weapon
Every folder in app/ can have a _layout.tsx. This file:
- Wraps all screens in that folder
- Defines which navigator type is used (Stack, Tabs, Drawer)
- Provides context, headers, or shared UI to all child screens
- Is the single source of truth for layout in that section of the app
// app/(tabs)/_layout.tsx
import { Tabs } from 'expo-router';
import { Ionicons } from '@expo/vector-icons';

export default function TabLayout() {
  return (
    <Tabs screenOptions={{ tabBarActiveTintColor: '#007AFF' }}>
      <Tabs.Screen
        name="index"
        options={{
          title: 'Home',
          tabBarIcon: ({ color }) => <Ionicons name="home" color={color} size={24} />,
        }}
      />
      <Tabs.Screen
        name="explore"
        options={{ title: 'Explore' }}
      />
      <Tabs.Screen
        name="profile"
        options={{ title: 'Profile' }}
      />
    </Tabs>
  );
}
This one file configures the entire tab bar for the (tabs) section. Every screen in that folder automatically gets the tab bar. Remove a screen file, it disappears from the tab bar.
Nested Layout Hierarchy
Nested Layout Hierarchy:
━━━━━━━━━━━━━━━━━━━━━━━━━━━━━━━━━━━━━━━━━━━━━━━━

app/_layout.tsx
└── Root Layout
    ├── Loads fonts
    ├── Sets up auth state
    ├── Wraps everything in ThemeProvider
    └── Decides: show (auth) or (tabs)?

    app/(auth)/_layout.tsx
    └── Auth Stack Layout
        ├── Simple Stack navigator
        ├── No tab bar
        └── Minimal header
            ├── login.tsx
            ├── register.tsx
            └── forgot-password.tsx

    app/(tabs)/_layout.tsx
    └── Tab Layout
        ├── Bottom tab bar
        ├── Tab icons and labels
        └── Shared tab bar styling

        app/(tabs)/(feed)/_layout.tsx
        └── Feed Stack Layout
            ├── Stack navigator inside the tab
            ├── Shared header back button behavior
            └── Gesture configuration
                ├── index.tsx        (Feed home)
                ├── [postId].tsx     (Post detail)
                └── [postId]/comments.tsx
Shared Context Without Prop Drilling
One of the most underrated features of _layout.tsx: you can wrap child screens in context providers once, and every screen in that folder gets access.
// app/(tabs)/_layout.tsx
export default function TabLayout() {
  return (
    <UserPreferencesProvider>  {/* All tab screens get this */}
      <Tabs>
        <Tabs.Screen name="index" />
        <Tabs.Screen name="profile" />
      </Tabs>
    </UserPreferencesProvider>
  );
}
In React Navigation, you'd wrap each screen component individually, or create a higher-order wrapper, or use a global context at the root. With Expo Router, you place the provider in the right _layout.tsx and it's scoped precisely where you need it.
8. Protected Routes and Authentication Flows
The React Navigation Approach
In React Navigation, auth protection is typically done by conditionally rendering different navigator trees:
// React Navigation auth pattern
function AppNavigator() {
  const { isAuthenticated } = useAuth();

  return (
    <NavigationContainer>
      {isAuthenticated ? (
        <AuthenticatedStack />
      ) : (
        <UnauthenticatedStack />
      )}
    </NavigationContainer>
  );
}
This works well but has some rough edges:
- The auth check happens inside the navigator, so you can't navigate until auth state is resolved.
- Deep links during the auth-loading phase can cause race conditions.
- If you need different protection levels (admin routes, premium routes), the conditional logic compounds.
The Expo Router Approach
Expo Router centralizes auth protection in the root _layout.tsx using useSegments() and useRouter():
// app/_layout.tsx — Protected Route Auth Flow
export default function RootLayout() {
  const { user, isLoading } = useAuthStore();
  const segments = useSegments();
  const router = useRouter();

  useEffect(() => {
    if (isLoading) return; // Wait for auth check to complete

    const inAuthGroup = segments[0] === '(auth)';

    if (!user && !inAuthGroup) {
      // Not authenticated, trying to access protected screen → redirect to login
      router.replace('/(auth)/login');
    } else if (user && inAuthGroup) {
      // Authenticated, on login screen → redirect to app
      router.replace('/(tabs)');
    }
  }, [user, isLoading, segments]);

  if (isLoading) return <SplashScreen />;

  return (
    <Stack screenOptions={{ headerShown: false }}>
      <Stack.Screen name="(auth)" />
      <Stack.Screen name="(tabs)" />
    </Stack>
  );
}
Protected Route Authentication Flow
App Launches
    │
    ▼
Root _layout.tsx renders
    │
    ├── isLoading = true → Show SplashScreen (block render)
    │
    └── isLoading = false
            │
            ├── Check: is user on an (auth) screen?
            │       AND user is authenticated?
            │       └── YES → router.replace('/(tabs)')
            │
            ├── Check: is user on a protected screen?
            │       AND user is NOT authenticated?
            │       └── YES → router.replace('/(auth)/login')
            │
            └── No redirect needed → render current route
                    │
                    ▼
              App flows normally.
              Auth state changes trigger the useEffect again.
              Logout automatically redirects to /(auth)/login.
Granular Route Protection (Admin Example)
For apps with multiple access levels (free user, premium, admin):
// app/(admin)/_layout.tsx
export default function AdminLayout() {
  const { user } = useAuthStore();
  const router = useRouter();

  useEffect(() => {
    if (user && user.role !== 'admin') {
      router.replace('/(tabs)'); // Kick non-admins out
    }
  }, [user]);

  if (user?.role !== 'admin') return null;

  return <Stack />;
}
Each section of your app can protect itself. No centralized mega-conditional. The (admin) folder's layout handles admin protection. The (premium) folder's layout handles premium protection. Each is a one-time, self-contained concern.
9. Performance Comparison
Bundle Behavior
React Navigation:
You import and register every screen upfront. All screen components are part of the initial bundle unless you manually implement lazy loading with React.lazy() and Suspense.
// Every screen is imported at the top — all land in the bundle
import HomeScreen from '../screens/HomeScreen';
import ProfileScreen from '../screens/ProfileScreen';
import { HeavyMapScreen } from '../screens/HeavyMapScreen'; // Loaded even if user never visits
Expo Router:
Route files are loaded on-demand by default. The app/ directory is code-split automatically. A screen isn't imported until its route is navigated to.
app/
├── (tabs)/index.tsx       ← Loaded at startup (default tab)
└── heavy-map.tsx          ← Loaded only when user navigates to /heavy-map
Winner for bundle behavior: Expo Router — automatic code splitting with no configuration.
Navigation Transitions
Both libraries use the same underlying navigation primitives (@react-navigation/native, react-native-screens). Transition animations are identical in quality because Expo Router delegates all transition logic to React Navigation.
Winner: Tie — same engine under the hood.
Developer Workflow
React Navigation workflow for a new screen:
- Create
src/screens/NewScreen.tsx - Import it in the navigator file
- Add
<Stack.Screen name="NewScreen" component={NewScreen} /> - Add its deep link config to the
linkingobject - Add TypeScript param types to the navigator's param list
- Navigate to it with
navigation.navigate('NewScreen', { id: '123' })
Six steps. Four files touched.
Expo Router workflow for a new screen:
- Create
app/new-screen.tsx
One step. One file. Deep link is automatic. TypeScript types are generated.
Winner for developer workflow: Expo Router — by a significant margin.
10. Developer Experience (DX) Comparison
Side-by-Side DX Comparison
Developer Experience at a Glance
━━━━━━━━━━━━━━━━━━━━━━━━━━━━━━━━━━━━━━━━━━━━━━━━━━━━━━━━━━━

                        React Navigation    Expo Router
━━━━━━━━━━━━━━━━━━━━━━━━━━━━━━━━━━━━━━━━━━━━━━━━━━━━━━━━━━━
Adding a new screen     Manual (4 steps)    Create a file
Deep link setup         Manual config       Automatic
TypeScript types        Write manually      Auto-generated
Understanding app flow  Read navigator.tsx  Read folder tree
Shared layouts          Wrap + HOC          _layout.tsx
Protected routes        Conditional render  useSegments hook
Onboarding new devs     Hours → days        Minutes
Web + Native parity     Extra config        Built-in
Expo Go support         Yes                 Yes (first-class)
Testing routes          Simulate navigate   Actual URL
━━━━━━━━━━━━━━━━━━━━━━━━━━━━━━━━━━━━━━━━━━━━━━━━━━━━━━━━━━━
TypeScript Experience
React Navigation TypeScript requires you to define a params map and annotate every navigator:
// Types you write and maintain manually
type RootStackParamList = {
  Home: undefined;
  Profile: { userId: string };
  PostDetail: { postId: string; fromFeed: boolean };
  Settings: undefined;
};

// Then use everywhere
const navigation = useNavigation<NativeStackNavigationProp<RootStackParamList, 'Profile'>>();
This is verbose but gives full type safety. The downside: it's manual. Every new screen needs a new type entry.
Expo Router auto-generates TypeScript types from your file structure when you run npx expo start. You get a typed-routes.d.ts file automatically:
// Expo Router typed navigation — zero manual maintenance
import { Link } from 'expo-router';

// This is fully typed — TypeScript knows /posts/[postId] requires a postId
<Link href="/posts/123" />
<Link href={{ pathname: '/posts/[postId]', params: { postId: '123' } }} />
Winner for TypeScript DX: Expo Router — types reflect reality automatically.
Beginner Perspective
For someone new to React Native:
React Navigation has a steeper learning curve because you must understand:
- What a
NavigationContaineris and why it goes at the root - The difference between Stack, Tab, and Drawer navigators
- How to compose nested navigators
- How
navigation.navigate()works and where to get thenavigationobject - How to configure deep links separately
All of this before writing a single screen.
Expo Router has a gentler entry:
- Create an
app/folder. Put a file in it. That's a screen. - The routing works like Next.js — familiar to anyone with web experience.
- Links between screens use the
<Link>component — same mental model as HTML.
Winner for beginners: Expo Router — the file-based model requires less upfront knowledge.
11. Scalability Comparison for Large Applications
React Navigation at Scale
React Navigation scales well when:
- Your team establishes conventions early (naming, file structure, param types)
- You split your navigator into multiple files (one per feature)
- You build a typed navigation service that wraps
navigate()
The challenges at scale:
- Navigation config is centralized — changes to routes require careful coordination
- Refactoring screen names is a grep-and-replace operation across the whole codebase
- New team members must learn the navigation architecture before contributing
Mitigation pattern used by large teams:
src/navigation/
├── RootNavigator.tsx
├── AuthNavigator.tsx
├── TabNavigator.tsx
├── FeedNavigator.tsx
├── ProfileNavigator.tsx
└── types.ts               ← All param types in one place
Splitting into files helps, but it's still manual maintenance.
Expo Router at Scale
Expo Router scales naturally because:
- The file structure is the navigation structure — no separate mental model
- Adding a feature means adding a folder — no navigator file to update
- Route names can't drift from file names — they're the same thing
- New developers understand the app structure from the folder tree
The challenge at scale:
- Expo Router imposes conventions. If your app needs deeply non-standard navigation patterns, you fight the framework.
- Large Expo Router projects can have deep folder nesting that becomes hard to navigate in the file system.
Scalability Comparison
Scalability Dimensions
━━━━━━━━━━━━━━━━━━━━━━━━━━━━━━━━━━━━━━━━━━━━━━━━━━━━━━━

Dimension               React Navigation    Expo Router
━━━━━━━━━━━━━━━━━━━━━━━━━━━━━━━━━━━━━━━━━━━━━━━━━━━━━━━
Team onboarding         Slow                Fast
Adding new screens      Manual, error-prone Automatic
Route refactoring       Risky               Safe (file rename)
Feature boundaries      Manual convention   Folder = feature
Deep link maintenance   Manual config       Zero config
Multi-team development  Conflict-prone      Independent
Monorepo support        Yes                 Yes
━━━━━━━━━━━━━━━━━━━━━━━━━━━━━━━━━━━━━━━━━━━━━━━━━━━━━━━
Winner for scalability: Expo Router — convention-over-configuration wins at scale when teams are large and changing.
12. Real-World App Folder Structure Examples
React Navigation: Production App Structure
my-app/
├── src/
│   ├── navigation/
│   │   ├── RootNavigator.tsx        ← Main navigator file
│   │   ├── AuthNavigator.tsx        ← Auth screens stack
│   │   ├── TabNavigator.tsx         ← Tab bar config
│   │   ├── FeedNavigator.tsx        ← Feed stack
│   │   ├── MessagesNavigator.tsx    ← Messages stack
│   │   └── types.ts                 ← All RootStackParamList types
│   │
│   ├── screens/
│   │   ├── auth/
│   │   │   ├── LoginScreen.tsx
│   │   │   ├── RegisterScreen.tsx
│   │   │   └── ForgotPasswordScreen.tsx
│   │   ├── feed/
│   │   │   ├── FeedScreen.tsx
│   │   │   └── PostDetailScreen.tsx
│   │   ├── messages/
│   │   │   ├── ConversationsScreen.tsx
│   │   │   └── ChatRoomScreen.tsx
│   │   └── profile/
│   │       └── ProfileScreen.tsx
│   │
│   ├── components/
│   ├── hooks/
│   ├── services/
│   └── store/
│
└── App.tsx                          ← Renders <NavigationContainer>
Count of files to update when adding a new "Explore" screen:
ExploreScreen.tsx + TabNavigator.tsx + types.ts = 3 files minimum.
Expo Router: Production App Structure
my-app/
├── app/
│   ├── _layout.tsx                  ← Root layout + auth guard
│   ├── index.tsx                    ← Entry redirect
│   │
│   ├── (auth)/
│   │   ├── _layout.tsx
│   │   ├── login.tsx
│   │   ├── register.tsx
│   │   └── forgot-password.tsx
│   │
│   ├── (tabs)/
│   │   ├── _layout.tsx              ← Tab bar defined here
│   │   ├── index.tsx                ← Home/Feed tab
│   │   ├── explore.tsx              ← Explore tab
│   │   ├── messages.tsx             ← Messages tab
│   │   └── profile.tsx              ← Profile tab
│   │
│   ├── posts/
│   │   └── [postId].tsx
│   │
│   ├── chat/
│   │   └── [chatId].tsx
│   │
│   └── +not-found.tsx
│
├── src/
│   ├── features/                    ← Business logic, unchanged from React Navigation
│   ├── shared/
│   ├── lib/
│   └── store/
│
└── app.json
Count of files to update when adding a new "Explore" screen:
app/(tabs)/explore.tsx = 1 file. Add it to _layout.tsx tabs config = optionally 1 more.
Feature-Based Expo Router Structure (Enterprise Scale)
app/
├── _layout.tsx
│
├── (auth)/
│   ├── _layout.tsx
│   ├── login.tsx
│   └── register.tsx
│
├── (tabs)/
│   ├── _layout.tsx
│   │
│   ├── (feed)/                      ← Feed feature — nested stack in tab
│   │   ├── _layout.tsx
│   │   ├── index.tsx                → /feed
│   │   ├── [postId].tsx             → /feed/post123
│   │   └── [postId]/
│   │       └── comments.tsx         → /feed/post123/comments
│   │
│   ├── (explore)/
│   │   ├── _layout.tsx
│   │   ├── index.tsx
│   │   └── search.tsx
│   │
│   ├── (messages)/
│   │   ├── _layout.tsx
│   │   ├── index.tsx                → /messages
│   │   └── [chatId].tsx             → /messages/chat456
│   │
│   └── profile.tsx
│
└── (modals)/
    ├── _layout.tsx
    ├── create-post.tsx
    └── story-viewer.tsx
This structure maps directly to your features. A new engineer can look at the app/ folder and understand the entire navigation structure of the app in under a minute.
13. Which Approach Companies and Teams Prefer
The Reality of Adoption in 2026
React Navigation remains the most widely deployed. The reasons are practical:
- Most existing React Native codebases were started before Expo Router existed.
- It's the first library in every React Native tutorial, book, and course written before 2023.
- Large enterprises are conservative about switching navigation libraries in production apps.
- Many React Native apps are built without the Expo managed workflow — just bare React Native — and React Navigation integrates into any setup without opinion.
Expo Router has rapidly gained adoption among:
- New projects started in 2023 and later.
- Teams already using the Expo ecosystem (EAS Build, EAS Submit, Expo Go).
- Teams who want web + native parity (Expo Router is the only solution that routes identically on both).
- Developer advocates, bootcamps, and educators — the learning curve is genuinely lower.
What Production Teams Say
"We use React Navigation because we migrated from an older codebase" This is the most common answer from established teams. Migrating a large navigation system is expensive — usually not worth the immediate DX gain.
"We use Expo Router for all new projects" This is increasingly common from teams building greenfield apps. The file-based model, automatic deep links, and built-in web support make it the natural default for new Expo projects.
"We use React Navigation but follow Expo Router's folder conventions" Some teams adopt the folder structure pattern from Expo Router (one folder per feature, layouts separated) while keeping manual React Navigation config. Best of both worlds, but requires team discipline.
Rule of Thumb
| Situation | Recommendation |
|---|---|
| New project, Expo workflow | Expo Router |
| New project, bare React Native | React Navigation |
| Existing codebase | Stay with React Navigation |
| Need web + native parity | Expo Router |
| Team with Next.js experience | Expo Router (familiar mental model) |
| Pure React Native team (no Expo) | React Navigation |
14. When NOT to Use Expo Router
Expo Router Is Not for Every Situation
Expo Router is excellent, but there are real situations where it's the wrong choice. Use it with open eyes.
1. You're not using the Expo ecosystem
Expo Router requires Expo. If your project is bare React Native (created with react-native init) and heavily integrated with native modules via custom native code, adding Expo Router means adding Expo tooling. That's a significant dependency for projects that have intentionally avoided it.
2. You need non-standard navigation patterns Expo Router works beautifully for apps that fit the Stack/Tab/Modal model. But if your app needs:
- Heavily custom transition animations that override the default gesture system
- Conditional tab bars that appear only in specific states
- Complex side-drawer navigation with nested tabs and stacks in unusual combinations
...you'll be fighting Expo Router's conventions. React Navigation gives you lower-level access.
3. You're migrating an existing large app Migrating an existing React Navigation app to Expo Router isn't just a refactor — it's a full restructuring. Your file system has to match your routes. Your navigation calls change. Your deep link config moves. For a large existing app, this is months of work with no user-visible benefit. The ROI is rarely there.
4. Your team doesn't use TypeScript Expo Router's TypeScript auto-generation is one of its best features. Without TypeScript, you lose a significant part of its DX advantage. The file-based routing still helps, but less so.
5. You have strict bundle size requirements and need granular control Expo Router does automatic code splitting, but you can't easily override its splitting decisions. React Navigation lets you be more explicit about what's lazy-loaded and when.
6. You're building a custom expo-config-plugin-heavy native module setup Some very specialized native configurations can conflict with Expo Router's metro configuration expectations. If you're deep in custom native code, test early.
15. Situations Where React Navigation Still Makes More Sense
React Navigation's Enduring Strengths
React Navigation isn't a legacy library being replaced by Expo Router. It's a mature, actively maintained library that remains the right choice in important scenarios.
Scenario 1: Bare React Native projects Any project not using Expo uses React Navigation. It's the standard for non-Expo React Native. No debate here.
react-native init MyApp
→ React Navigation. Full stop.
Scenario 2: Maximum navigation control React Navigation exposes every part of its internals. Custom navigators. Custom transitions. Intercepting navigation actions. Headless navigation (navigating from outside React).
// React Navigation: full control over custom navigators
function MyCustomNavigator({ state, navigation, descriptors, router }) {
  // Build literally any navigation pattern you want
}
Expo Router doesn't expose this level of control. If you need it, React Navigation is the answer.
Scenario 3: Non-standard screen presentation patterns Some apps have unique navigation flows that don't fit the Stack/Tab/Modal model:
- A canvas-based app where screens slide horizontally based on gestures
- A kiosk app with no back navigation at all
- An onboarding flow with branching paths and custom progress tracking
React Navigation gives you the primitives. You build the pattern.
Scenario 4: Existing team expertise A team that has two years of React Navigation experience, has built their own typed navigation layer, and has established patterns for auth, deep links, and state — they're probably more productive staying with what they know than switching to Expo Router.
The DX improvement of Expo Router is real, but it's measured in developer-hours per feature. If your team is already efficient with React Navigation, the learning curve of switching has a cost too.
Scenario 5: Hybrid apps with significant web WebView content Some React Native apps are mostly WebView-based, with native screens for authentication and settings. Expo Router's web routing is a strength — but if your "web" is already a WebView and not a React web app, this advantage disappears.
Scenario 6: Integration with third-party navigation solutions Some enterprise apps need to integrate with third-party navigation SDKs — navigation analytics, A/B testing of flows, remote-controlled navigation. These tools are built against React Navigation's API. Expo Router's abstraction layer can create compatibility issues.
The Honest Summary
React Navigation vs Expo Router — Honest Decision Matrix
━━━━━━━━━━━━━━━━━━━━━━━━━━━━━━━━━━━━━━━━━━━━━━━━━━━━━━━━━━━

                          React     Expo
Decision Factor           Nav       Router    Winner
━━━━━━━━━━━━━━━━━━━━━━━━━━━━━━━━━━━━━━━━━━━━━━━━━━━━━━━━━━━
Using Expo ecosystem?      ○         ●        Expo Router
Bare React Native?         ●         ○        React Navigation
New project?               ○         ●        Expo Router
Existing codebase?         ●         ○        React Navigation
Beginner friendly?         ○         ●        Expo Router
Max nav control?           ●         ○        React Navigation
Web + Native parity?       ○         ●        Expo Router
Non-Expo native modules?   ●         ○        React Navigation
Team DX & speed?           ○         ●        Expo Router
Custom nav patterns?       ●         ○        React Navigation
Auto deep links?           ○         ●        Expo Router
Large team scalability?    ○         ●        Expo Router
━━━━━━━━━━━━━━━━━━━━━━━━━━━━━━━━━━━━━━━━━━━━━━━━━━━━━━━━━━━
● = Advantage    ○ = Disadvantage/Neutral
The Bottom Line
Here's the no-fluff answer:
Start new Expo projects with Expo Router. The file-based routing, automatic deep links, built-in auth guard pattern, shared layouts via _layout.tsx, and auto-generated TypeScript types are a genuine DX improvement. The mental model is easier. The team onboarding is faster. The folder structure is the documentation.
Keep React Navigation for existing projects and bare React Native. Migrating a large navigation system for DX gains is almost never worth it. React Navigation is not going anywhere — it's actively maintained, it powers Expo Router internally, and it will be a first-class choice for years to come.
Remember: Expo Router is React Navigation. There's no performance tradeoff, no compatibility risk, no "choosing the less proven library." You're using the same engine with better conventions. That's not a compromise — that's progress.
The best architecture choice is the one your team ships with. Pick what your team can move fast with, and go build something.
Quick Reference Summary
| You should use Expo Router when... | You should use React Navigation when... |
|---|---|
| Starting a new Expo project | Using bare React Native (no Expo) |
| Team has Next.js / web background | You have an existing navigation setup |
| You want automatic deep links | You need maximum control over navigation |
| You need web + native on same codebase | You need custom navigator primitives |
| You value DX over maximum flexibility | You're integrating third-party nav tools |
| Large team, many contributors | Team has deep React Navigation expertise |
| You want TypeScript types auto-generated | You need non-standard navigation patterns |
Published as part of the Mobile Development Cohort — React Native track.
Next up: Building a production-grade auth flow with Expo Router + Zustand + MMKV.